Solar inverter failure is one of the most disruptive events a residential solar system can experience. When the inverter stops converting DC power from the panels into usable AC electricity, the entire system halts, regardless of how much sunlight is available. For homeowners across Delaware, Maryland, New Jersey, Pennsylvania, Virginia, and Washington, D.C., understanding the root causes of inverter failure, and knowing when to call a licensed specialist, is essential to protecting a significant energy investment. This guide covers the primary failure modes, practical solar inverter troubleshooting steps, and what a professional inverter repair process actually involves.
Table of Contents
- Quick Takeaways
- Why Solar Inverters Fail
- Solar Inverter Troubleshooting Steps
- Inverter Repair: What the Process Looks Like
- Inverter Types and Failure Rates Compared
- When Repair Is Not Enough: Replacement Criteria
- Preventive Maintenance That Extends Inverter Life
- Frequently Asked Questions
- References
Quick Takeaways
Key Insight | Explanation |
|---|---|
Overheating is the leading hardware cause | Insufficient ventilation around the inverter damages capacitors and transistors, degrading performance over time. |
Faulty installation accelerates failure | Mismatched panel-to-inverter sizing forces the unit to operate outside its design parameters, shortening its lifespan significantly. |
Grid faults can trigger shutdowns | High or low voltage events on the utility grid cause protective shutdowns; repeated events cause cumulative component stress. |
String inverters last roughly 10 to 15 years | Microinverters typically last 20 to 25 years, making inverter type a factor in long-term repair-versus-replace decisions. |
Fault codes are a first diagnostic tool | Most modern inverters display error codes on their screen or app; referencing the manufacturer manual narrows the fault quickly. |
MPPT module faults reduce output quietly | A failing Maximum Power Point Tracking module lowers energy yield without triggering an obvious shutdown, making monitoring data essential. |
Licensed electrical contractors should handle inverter repair | Inverter work involves live DC circuits and utility interconnection, both of which carry serious safety and code compliance requirements. |
Why Solar Inverters Fail
Solar inverters contain more active electrical components than any other part of a residential solar system. That density of components, combined with continuous operation under variable temperature and load conditions, creates multiple failure pathways. The four most common causes seen in practice are overheating, faulty wiring, installation errors, and grid-related faults.
Overheating and Thermal Stress
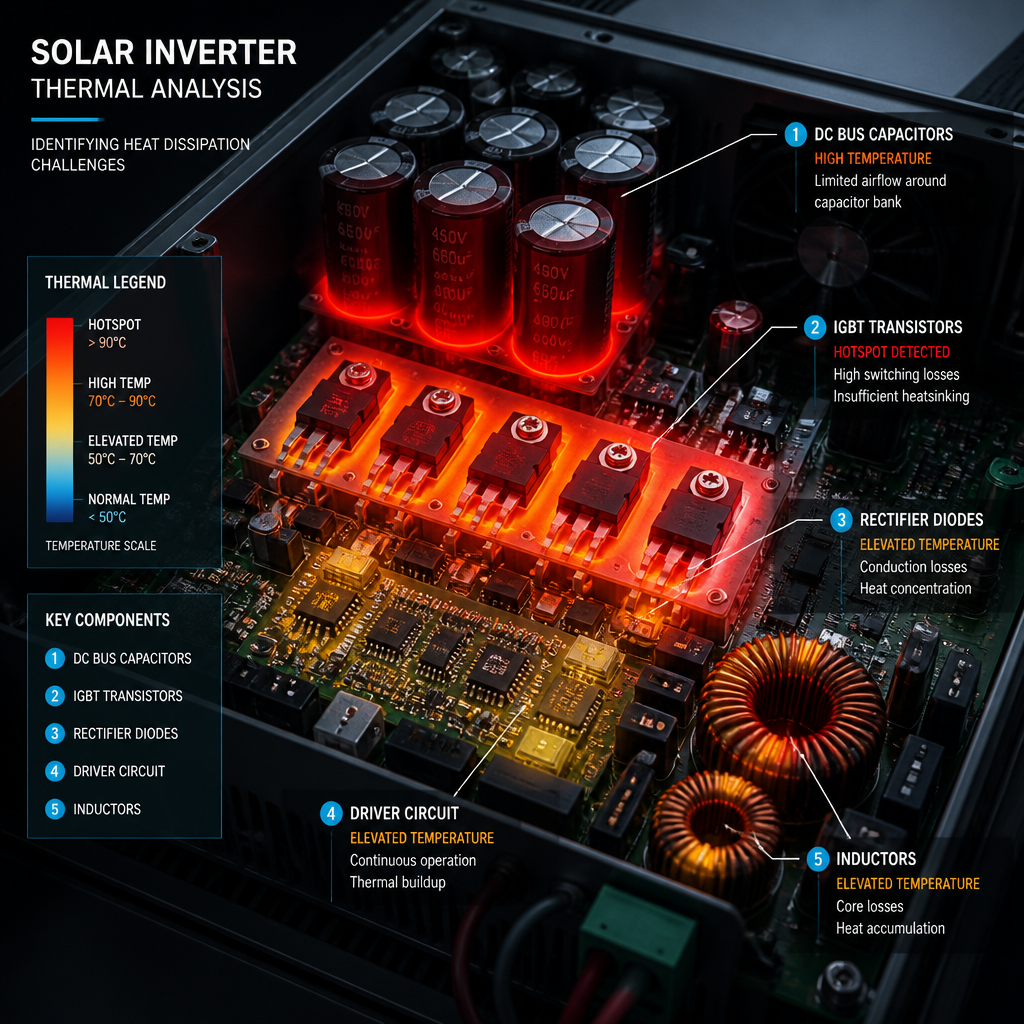
Overheating is the most frequently cited hardware cause of solar inverter failure. When an inverter operates in a poorly ventilated space, such as a sealed utility closet or a south-facing garage wall that receives direct afternoon sun, internal temperatures can exceed the unit's rated maximum. The immediate consequence is reduced output as the inverter throttles itself to protect internal components. The longer-term consequence is degradation of capacitors and transistors, both of which are critical to the DC-to-AC conversion process.
Dust accumulation on intake filters compounds the problem. Blocked filters reduce airflow across heat sinks, and in humid Mid-Atlantic summers, that combination of heat and moisture accelerates component aging measurably. Inverters installed in unconditioned spaces in states like Virginia or Maryland, where summer temperatures and humidity are high, are particularly susceptible.
Faulty Wiring and Poor Electrical Connections
Faulty wiring poses both a performance risk and a safety risk. Loose DC connections between the solar array and the inverter input create arcing conditions, which can damage internal circuitry and, in serious cases, create fire hazards. On the AC output side, improperly torqued terminals cause resistance heating at the connection point, which degrades the connection further over time in a self-reinforcing cycle.
In practice, wiring faults are often introduced at installation, either through incorrect wire gauge selection or connections that were not properly secured. They can also develop over time as thermal cycling causes connection hardware to loosen. A licensed electrical contractor performing a system check will use a clamp meter and thermal imaging to identify high-resistance connections before they cause inverter damage.
Installation Sizing Errors
A commonly overlooked cause of solar inverter failure is a mismatch between solar panel array capacity and inverter capacity. As a general sizing guideline, solar panel capacity should be no more than approximately 133% of the inverter's rated capacity. A 6 kW panel array, for example, should be paired with an inverter rated at approximately 4.5 kW. Operating outside these parameters forces the inverter to clip excess power continuously, generating additional heat and wear.
This type of error is difficult for a homeowner to detect after the fact without reviewing the original system design documents. If an inverter on a relatively new system is showing repeated overtemperature faults, a sizing review should be part of the diagnostic process.
Grid Faults and Voltage Events
Utility grid instability, including voltage spikes, sags, and frequency deviations, triggers protective shutdowns in grid-tied inverters. These shutdowns are a designed safety feature. However, repeated grid fault events cause cumulative stress on the inverter's internal protection components, including circuit breakers and surge protection devices. In areas served by aging utility infrastructure, grid-related faults are a more common inverter stressor than most homeowners expect.
Maximum Power Point Tracking Faults
The MPPT module within an inverter continuously adjusts its operating point to extract maximum power from the solar array under changing irradiance conditions. When the MPPT module develops a fault, the inverter typically continues to operate, but energy output drops below what the available sunlight should produce. This failure mode is particularly difficult to detect without monitoring data, because there is no alarm or shutdown to prompt investigation.
An inverter that appears to be running normally but consistently underperforms relative to expected output is a stronger indicator of an MPPT or capacitor fault than one that has shut down entirely. Silent degradation often causes more financial loss over time than a complete failure.
Solar Inverter Troubleshooting Steps
Structured solar inverter troubleshooting follows a logical sequence from the simplest and safest checks toward more involved electrical diagnostics. Homeowners can perform the first several steps safely; the remaining steps require a licensed contractor.
Step 1: Check the Display and Fault Codes
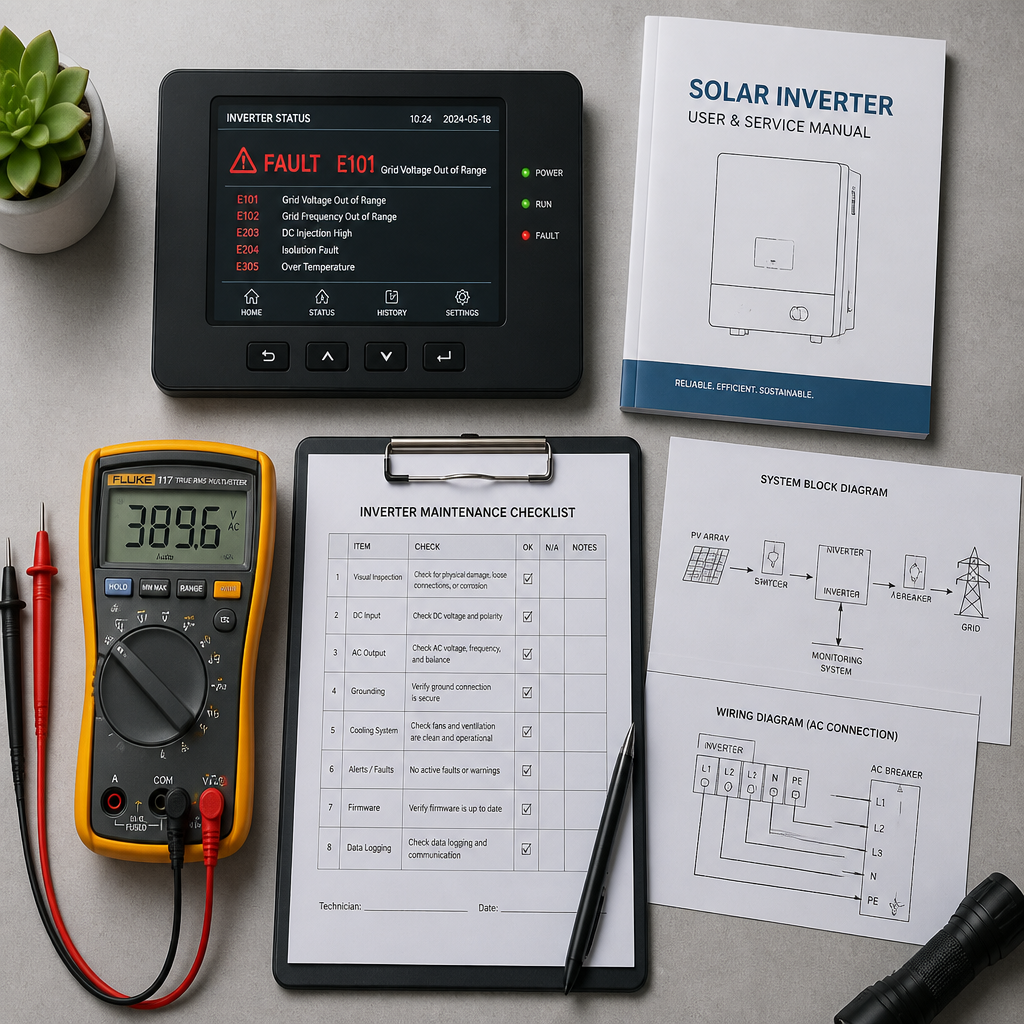
Most modern string inverters display operational status on a screen or via a connected monitoring application. The first step is to read any active fault codes and cross-reference them with the manufacturer's documentation. Fault codes narrow the diagnostic scope immediately, distinguishing between grid faults, isolation faults, overtemperature conditions, and communication errors without any electrical testing.
Pro tip: Take a photograph of the fault code display before resetting the inverter. If the fault recurs, having the exact code sequence allows a technician to trace the fault history and identify patterns without relying on the inverter's internal log alone.
Step 2: Inspect the Physical Environment
Verify that the inverter's ventilation clearances are unobstructed. Objects stored against the unit, dust-blocked filters, and direct sun exposure on the enclosure are all correctable without tools. Also check for visible signs of moisture intrusion on or around the enclosure, particularly in installations near exterior walls in climates with freeze-thaw cycles, which are common across Pennsylvania, New Jersey, and Delaware.
Step 3: Verify Circuit Breaker and Disconnect Status
Check that the AC disconnect, the DC disconnect, and the main service panel breaker associated with the solar circuit are all in their correct positions. A tripped breaker following a grid event is a common and easily resolved cause of an inverter appearing dead. If a breaker trips immediately upon reset, do not reset it again. That behavior indicates a fault that requires professional diagnosis.
Step 4: Review Monitoring Data History
If the system has a monitoring portal, examine the historical production data for the days or weeks preceding the fault. A gradual decline in daily output often precedes an outright failure and points toward component degradation rather than a sudden fault event. A sharp drop on a specific date may correlate with a grid event or a wiring disturbance.
Pro tip: Compare the system's actual output against the expected output for the same period based on local weather data. A consistent 15 to 20 percent underperformance gap, even without a fault code, justifies a professional inspection of the MPPT module and DC wiring.
Inverter Repair: What the Process Looks Like
Professional inverter repair begins with a full system diagnostic that goes beyond what the fault code alone reveals. A licensed technician will measure DC input voltage and current from the array, verify MPPT operating parameters, check AC output voltage and frequency, and perform an insulation resistance test on the DC wiring. This data establishes whether the fault is within the inverter itself or external to it.
Component-Level Repairs
When the fault is confirmed to be within the inverter, common component-level repairs include replacing degraded capacitors, replacing failed cooling fans within the inverter enclosure, and repairing or replacing damaged MPPT modules. Capacitor replacement is one of the more cost-effective repairs available, as capacitors are a known wear component in power electronics. Replacing them before a cascade failure occurs can extend the serviceable life of the unit by several years.
Fan replacement addresses thermal management directly. An inverter that was functioning adequately with a working cooling fan may begin overheating almost immediately when the fan fails, particularly during summer operation in the Mid-Atlantic region.
Firmware and Configuration Issues
Not all inverter problems are hardware-related. Firmware corruption or incorrect configuration settings can cause persistent fault conditions that mimic hardware failures. A technician with manufacturer training and access to configuration software can reset and reprogram the inverter, resolving these faults without any component replacement. This is a common finding in inverters that were affected by a grid event or a power surge.
When the Inverter Must Be Sent for Service
Some inverter faults, particularly those involving the main power board or the transformer in older string inverters, require factory or depot-level repair. In these cases, the technician will coordinate the warranty claim or depot repair process with the manufacturer. During this period, the solar system is offline, which makes having a documented repair timeline and a point of contact with the service provider important for the homeowner.
Inverter Types and Failure Rates Compared
The type of inverter installed on a residential system affects both the nature of potential failures and the repair approach. The table below compares the three primary inverter architectures across the dimensions most relevant to homeowners evaluating repair options.
Inverter Type | Typical Lifespan | Common Failure Modes and Repair Notes |
|---|---|---|
String Inverter | 10 to 15 years | Capacitor degradation, MPPT faults, and fan failure are the most common repairs. A single unit failure affects the entire array output. Component-level repairs are generally feasible within the first 10 years. |
Microinverter | 20 to 25 years | Individual unit failures affect only one panel's output. Replacement of a failed unit is the standard repair. Cumulative cost of multiple unit replacements over time should factor into long-term budgeting. |
Power Optimizer plus String Inverter | Optimizers: 20-25 years; Inverter: 10-15 years | Failures can originate in either the optimizer units on the roof or the central string inverter. Diagnostics must evaluate both segments. Optimizer replacement at individual panels is typically straightforward. |
When Repair Is Not Enough: Replacement Criteria
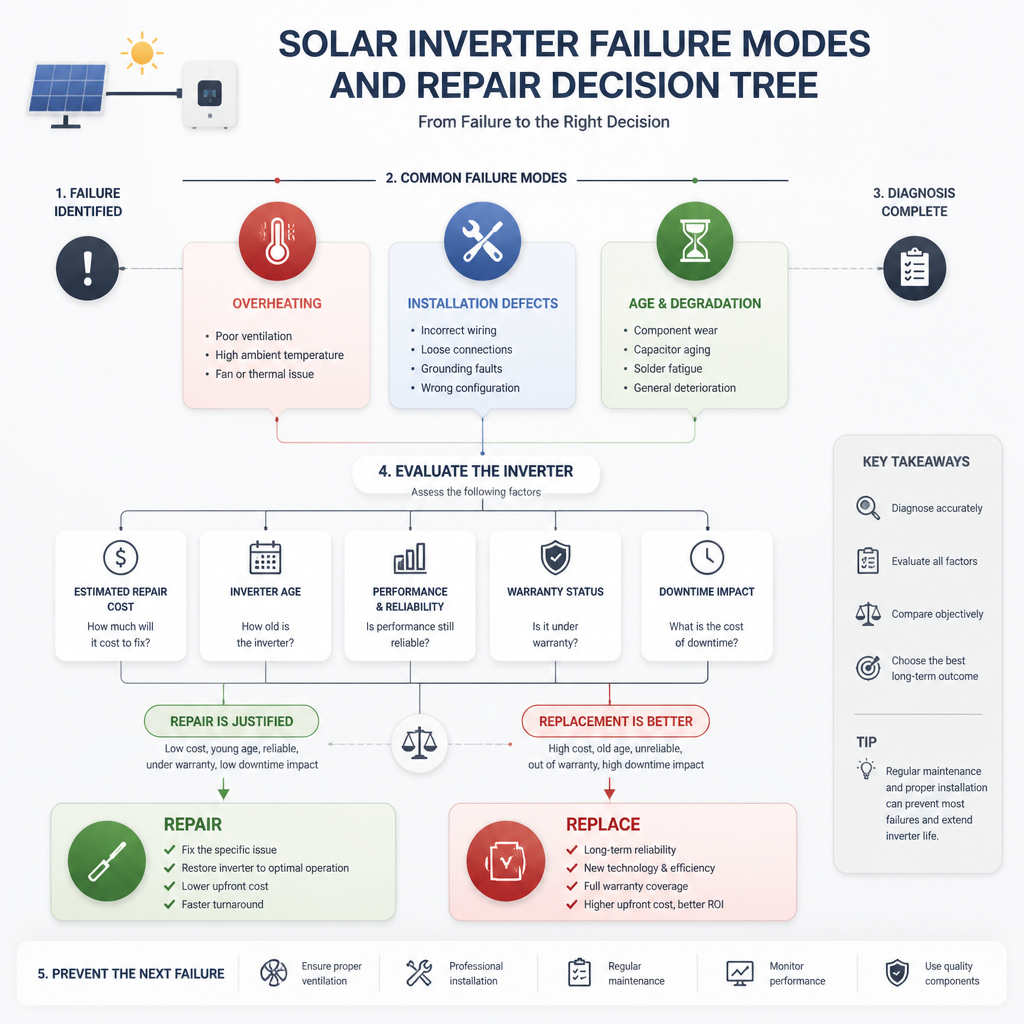
Not every failed inverter warrants repair. The decision between repairing and replacing depends on the unit's age, warranty status, the availability of replacement components, and how the repair cost compares to the cost of a new unit.
An inverter that is within its manufacturer warranty period should always be evaluated for a warranty repair or replacement claim before out-of-pocket costs are incurred. Many manufacturer warranties cover string inverters for 10 years and microinverters for 25 years, though terms vary. Reviewing warranty documentation as part of the initial diagnostic is standard practice for a qualified contractor.
For units that are out of warranty and approaching or past the typical lifespan, a full replacement often delivers better value than a significant repair investment. A replacement also provides an opportunity to upgrade to current inverter technology, which may offer better grid interaction features, improved monitoring, and compatibility with battery storage systems such as those Triple R Energy installs for homeowners across the Mid-Atlantic region.
If the existing inverter is incompatible with a battery storage addition the homeowner is considering, replacement rather than repair is almost always the correct path. Modern hybrid inverters are designed to interface directly with battery systems, which older single-mode string inverters are not.
Preventive Maintenance That Extends Inverter Life
Consistent maintenance measurably reduces both the frequency and severity of inverter faults. The following practices apply to residential systems throughout the Mid-Atlantic states.
Regular Filter and Ventilation Checks
Dust filters on string inverters should be inspected and cleaned at least twice per year, with additional checks after periods of construction activity near the property or following heavy pollen seasons, which are pronounced in the Maryland, Virginia, and D.C. region. Filters that are torn or collapsed should be replaced rather than cleaned.
Confirm that the minimum ventilation clearances specified in the installation manual are maintained around all sides of the inverter enclosure. Reorganizing stored items in garages or utility rooms is a straightforward step that meaningfully reduces overheating risk.
Annual Electrical Connection Inspection
An annual inspection by a licensed electrical contractor should include a check of all DC and AC terminal connections at the inverter for correct torque and signs of corrosion or discoloration. Thermal imaging of connections under load is a best-practice diagnostic that identifies high-resistance points before they cause damage. This inspection also provides an opportunity to verify that conduit and wire management have not been disturbed by pest activity, which is a documented finding in crawl space and attic-routed systems.
Monitoring System Review
Active monitoring, whether through the inverter manufacturer's platform or a third-party energy monitoring system, provides the earliest warning of performance degradation. Setting production alerts for deviations greater than 10 to 15 percent from expected output gives homeowners a prompt to investigate before a minor issue develops into a complete failure.
Frequently Asked Questions
How long do solar inverters typically last before failure?
String inverters have a general life expectancy of 10 to 15 years, while microinverters are rated for 20 to 25 years. Actual service life depends heavily on installation quality, operating environment, and whether maintenance is performed consistently. Units installed in hot, poorly ventilated spaces or on systems with oversized panel arrays tend to fail earlier than these benchmarks suggest.
Can a homeowner reset a failed solar inverter without professional help?
A homeowner can safely check for tripped breakers, read fault codes, and verify that the inverter's environment is clear of obstructions. A basic power cycle reset, following the manufacturer's instructions, is also within a homeowner's scope. However, any investigation that involves opening the inverter enclosure, working on DC wiring, or resetting a breaker that trips immediately upon restoration requires a licensed electrical contractor. The DC circuits in a solar system carry voltage even when the AC disconnect is open.
What does a fault code on a solar inverter mean?
A fault code is the inverter's internal diagnostic system communicating a specific detected condition. Common fault categories include grid voltage or frequency out of range, isolation resistance below the safe threshold on the DC side, overtemperature conditions, and communication failures with monitoring systems. The exact meaning of each code is manufacturer-specific and documented in the unit's technical manual. A licensed technician can interpret these codes in context with live electrical measurements to confirm whether the indicated fault is the root cause or a symptom of another issue.
Is inverter repair covered under a solar system warranty?
Most solar inverter manufacturers provide a separate equipment warranty for the inverter, distinct from any installer workmanship warranty. String inverter equipment warranties commonly run 10 years, with extended warranty options available for purchase. Microinverter warranties are typically 25 years. If an inverter fails within its warranty period, the cost of the replacement unit is generally covered, though labor costs for removal and reinstallation may or may not be included depending on the warranty terms. Reviewing the specific warranty documents is the only reliable way to determine coverage for a given unit.
When should inverter repair be chosen over full replacement?
Repair is generally the better choice when the inverter is within its warranty period, when the fault is limited to a known wear component such as a capacitor or cooling fan, and when the repair cost is substantially below the cost of replacement. Replacement becomes the better choice when the unit is out of warranty and near the end of its rated lifespan, when major board-level damage is present, when replacement components are no longer available from the manufacturer, or when the homeowner is planning to add battery storage and the existing inverter is not compatible with that upgrade.
How does a faulty MPPT module affect solar production?
A faulty Maximum Power Point Tracking module causes the inverter to operate the solar array at a suboptimal voltage, reducing the power extracted from the panels without triggering a shutdown or alarm. The effect is a consistent reduction in daily energy yield that is only apparent when monitoring data is compared against expected production. In practice, MPPT faults are one of the more financially significant failure modes because they can persist undetected for months, accumulating energy losses that a homeowner attributes to weather or seasonal variation rather than a repairable equipment fault.
If you have encountered an inverter fault on your residential solar system, sharing the specific fault code or symptom in the comments can help other homeowners in the region identify similar issues more quickly.
We would love your feedback and any insights you would share with others. What perspective would you add?